

If you've ever stared at a digital design wondering how someone created those perfectly repeating borders, intricate frames, or playful decorative elements without losing their mind, you've probably encountered the magic of illustrator pattern brushes. These aren't your average digital tools. They're the secret weapon behind seamless patterns, custom borders, and those "how did they DO that?" designs that make your work pop. Whether you're creating surface patterns for homewares, designing bold graphics for your brand, or just want to stop wrestling with repetitive shapes, mastering illustrator pattern brushes will change your entire creative workflow. And trust me, once you unlock their potential, you'll wonder how you ever designed without them.
What Makes Illustrator Pattern Brushes Different
Pattern brushes aren't just fancy lines. They're intelligent design tools that take your artwork and repeat it seamlessly along any path you draw.
Unlike standard brushes that simply stroke a path with colour, illustrator pattern brushes use actual vector artwork as the brush source. This means you can create borders, frames, ribbons, chains, vines, or literally anything that needs to repeat along a curve or straight line.
Here's what sets them apart:
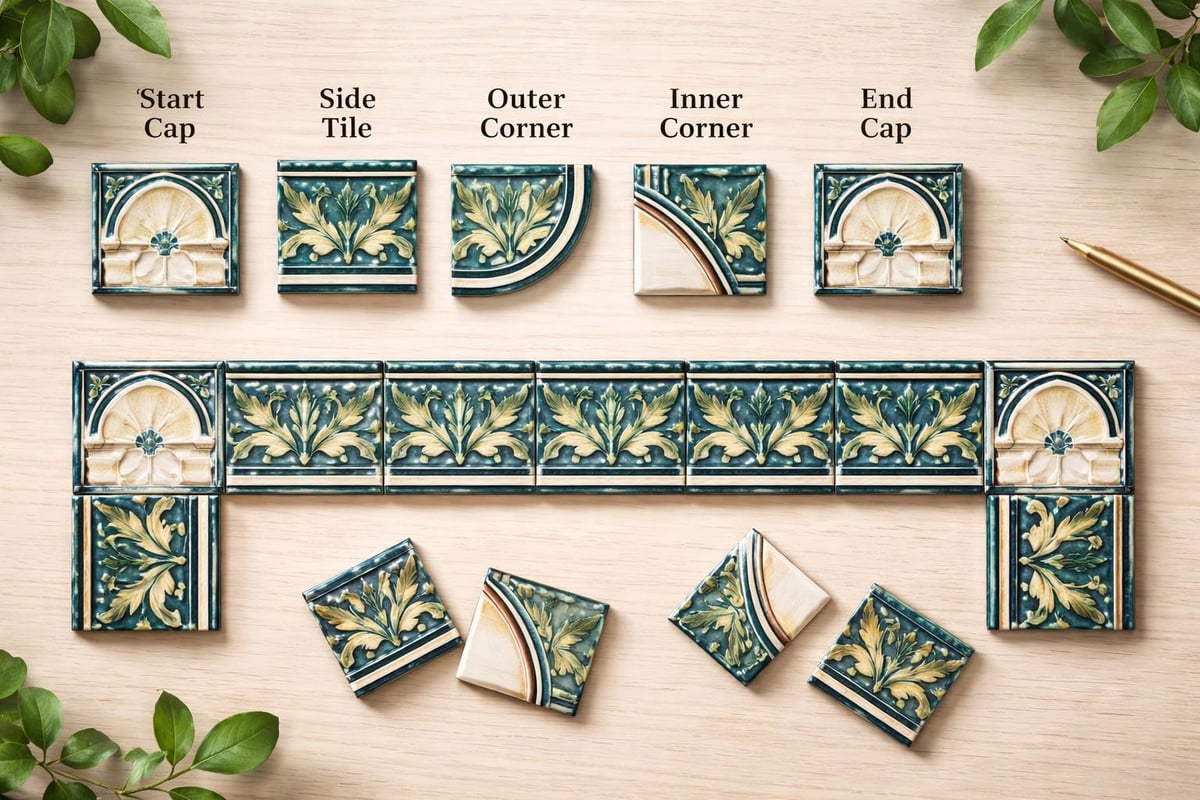
- They use up to five different tiles: side, outer corner, inner corner, start, and end
- They stretch, repeat, or fit to path automatically based on your settings
- They remain fully editable after application
- They scale without losing quality because they're vector-based
The real power? You draw one element once, and Illustrator does the repetitive work for you. No more copying, pasting, rotating, and trying to make things line up perfectly.
The Five-Tile System Explained
| Tile Type | Purpose | When It's Used |
|---|---|---|
| Side | Main repeating element | Along straight paths and curves |
| Outer Corner | Turns outward | When path angles out |
| Inner Corner | Turns inward | When path angles in |
| Start | Beginning cap | Start of open paths |
| End | Ending cap | End of open paths |
You don't need all five tiles for every brush. Sometimes just a side tile does the job beautifully. But when you're creating complex pattern designs that need to turn corners or finish cleanly, having all five options gives you professional-level control.
Creating Your First Pattern Brush From Scratch
Ready to build one yourself? It's surprisingly straightforward once you understand the logic.
Start with simple shapes. Seriously. Don't dive into complex artwork until you've nailed the basics. A circle, rectangle, or triangle makes an excellent first pattern brush because you can clearly see how it repeats and behaves.
Step-by-Step Process
- Create your artwork on the artboard (keep it relatively small, around 1-2 inches max)
- Select your artwork and ensure it's grouped if using multiple elements
- Drag the artwork directly into the Brushes panel
- Choose Pattern Brush from the dialogue box that appears
- Configure your settings (we'll cover these next)
- Name your brush something memorable
- Click OK and test it on a path
The beginner-friendly tutorial from Dezign Ark walks through creating an octopus pattern brush, which brilliantly demonstrates how organic shapes can repeat along paths.
Your first attempt might look wonky. That's normal. Pattern brushes have a learning curve, but they're forgiving. You can always double-click the brush in your panel to edit settings or replace the artwork entirely.
Settings That Actually Matter
When you create illustrator pattern brushes, you're faced with a dialogue box full of options. Most of them you'll rarely touch. But a few? Absolute game-changers.
Scale determines how large your pattern appears on the path. Start at 100% and adjust from there. If your pattern looks massive, drop it to 50% or lower. Tiny? Bump it up to 150% or 200%.
Spacing controls gaps between repeated elements. At 0%, elements touch. Increase it for breathing room, decrease (yes, you can go negative) for overlap.
Flip Along and Flip Across change orientation. These are brilliant when you want mirror effects or need patterns to face specific directions.
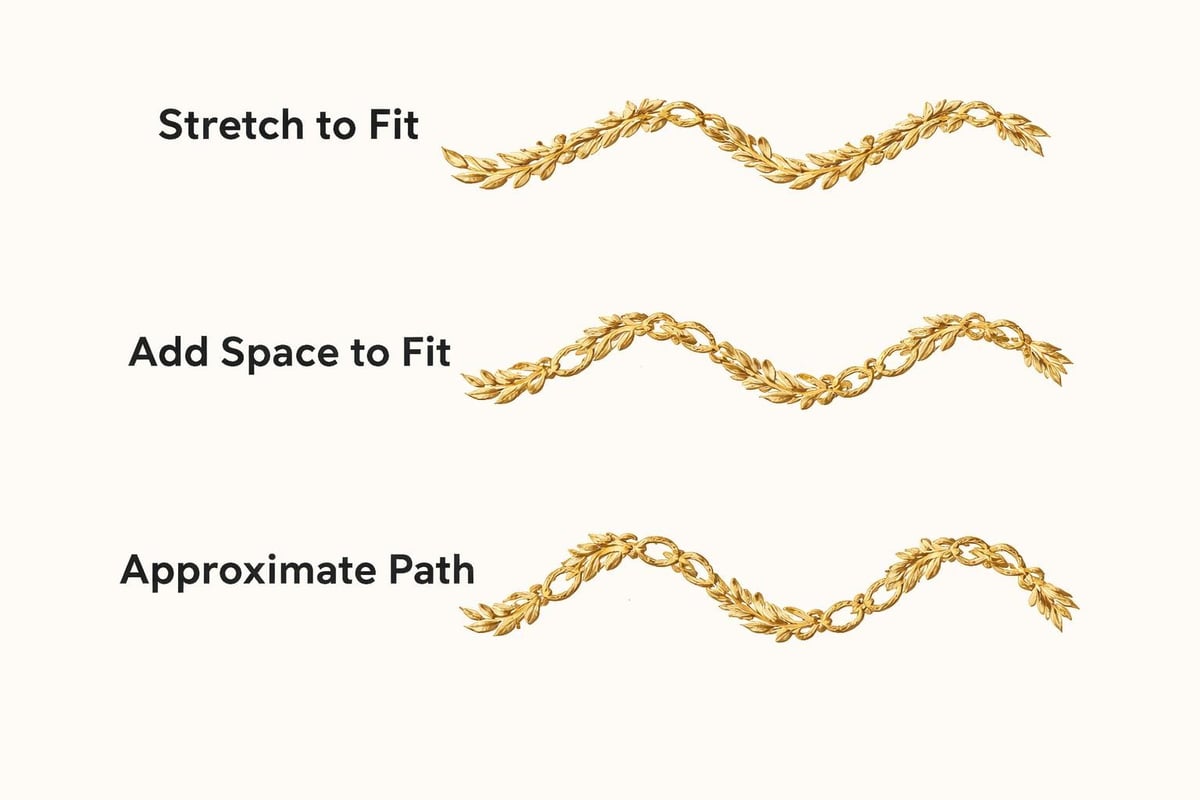
The Fit options deserve special attention:
- Stretch to Fit: Distorts tiles to fit path length exactly (can look weird on curves)
- Add Space to Fit: Adds spacing between tiles to fit perfectly (cleanest option usually)
- Approximate Path: Closest visual match without perfect fit (my personal favorite for organic work)
Colorization Method lets you change brush colours after applying them. None keeps original colours. Tints allows colour shifts. Hue Shift gives full colour control. For bold colour work, Hue Shift is your friend.
Corner Tiles: The Detail That Makes Everything Look Professional
Here's where illustrator pattern brushes go from "nice" to "bloody brilliant."
Corner tiles solve the awkward problem of what happens when your pattern turns a corner. Without them, side tiles just meet at angles, often creating gaps, overlaps, or visual chaos.
Creating corner tiles requires thinking about how your design pivots. Jeff Witchel's tutorial on pattern brush borders explores this beautifully, showing how custom corners create seamless transitions.
Quick Corner Creation Tips
- Outer corners should fan outward from the pivot point
- Inner corners should compress inward
- Keep corner artwork proportionally similar to side tiles
- Test on actual corner paths before committing
- Remember corners are optional but elevate the final result
For decorative frames, borders around personality-packed interiors, or product design elements, corner tiles transform amateur-looking work into professional-grade designs.
| Corner Type | Best For | Common Mistakes |
|---|---|---|
| Outer Corner | Frames, borders, outlines | Making it too different from side tile |
| Inner Corner | Cut-outs, negative spaces | Forgetting to account for direction change |
| Auto-generated | Quick projects | Accepting Illustrator's first suggestion |
Auto-generated corners (where Illustrator creates them for you) work in a pinch, but custom corners always look better. Always.
Real-World Applications for Surface Pattern Designers
Let's get practical. How do illustrator pattern brushes actually help you create stunning work?
Repeating borders on textiles, stationery, or homeware designs become effortless. Draw your motif once, create the brush, apply it to rectangles, circles, or custom shapes. Done.
Decorative frames for art prints, packaging, or digital products take minutes instead of hours. No more manually aligning individual elements around edges.
Ribbons and banners that actually look like they're flowing? Pattern brushes handle the curves and turns naturally. CreativeLive's lesson on pattern brushes demonstrates this technique brilliantly.
Custom dividers for stationery, planners, or digital layouts become part of your reusable asset library. Create once, use forever.
For those creating maximalist surface pattern designs for products and licensing, illustrator pattern brushes speed up production while maintaining that hand-crafted quality clients love.
Pattern Brush Ideas for Colour-Forward Design
- Geometric shapes in graduating sizes for modern, bold borders
- Hand-drawn elements (flowers, leaves, abstract marks) for organic feel
- Dots, dashes, or marks in vibrant colours for playful energy
- Interlocking shapes for complex, layered effects
- Typography elements for text-based pattern borders
The beauty? Each brush becomes a reusable asset. Build a library, and you've got instant design solutions for future projects.
Troubleshooting Common Pattern Brush Frustrations
Even experienced designers hit snags with illustrator pattern brushes. Here's how to fix the most annoying issues.
Gaps at corners? Your side tile probably isn't the right dimensions. Pattern brushes work best when side tiles have clear, definable widths. Adjust spacing or create custom corner tiles.
Stretching looks weird? Switch from "Stretch to Fit" to "Add Space to Fit" or "Approximate Path." Stretching distorts artwork, especially on tight curves.
Colours won't change? Check your Colorization Method. If it's set to "None," colours are locked. Switch to Tints or Hue Shift for flexibility.
Pattern looks choppy on curves? Increase the number of tiles by adjusting spacing, or reduce the size of your original artwork. Smaller tiles = smoother curves.
Can't select the actual path? You're clicking the pattern appearance, not the path itself. Use the Direct Selection tool (white arrow) or switch to Outline mode (Cmd/Ctrl + Y) to select the underlying path.
This YouTube tutorial walks through common problems beginners face, showing real-time fixes.
Advanced Techniques: Segmented Art Brushes Versus Pattern Brushes
Wait, there's another option? Yes. Segmented art brushes behave similarly to pattern brushes but with different strengths.
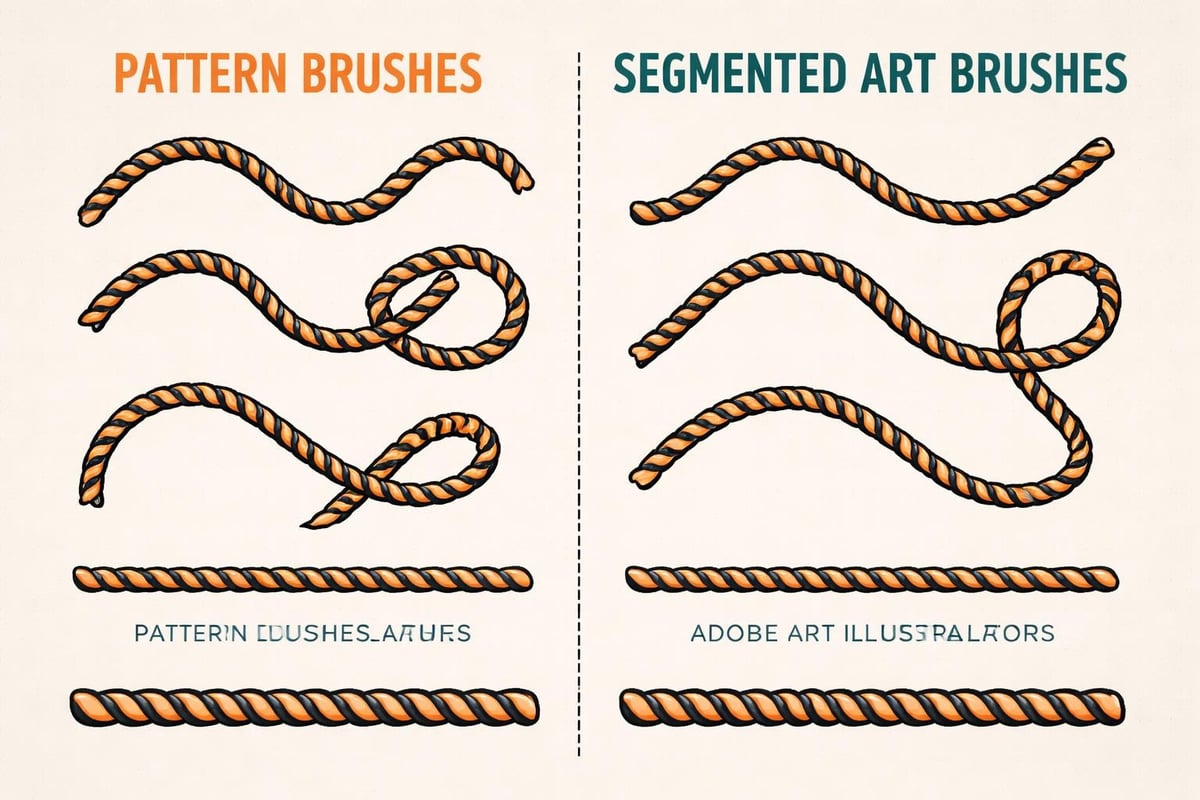
Pattern brushes use multiple tiles and handle corners automatically. Segmented art brushes (technically still art brushes, just built cleverly) use single artwork that repeats with more organic flexibility.
Designer Hannah Bacon's hot dog brush tutorial demonstrates this technique. The "hot dog" (a simple segmented shape) stretches and bends naturally along paths without the rigid structure of pattern brushes.
When to use pattern brushes:
- You need corner solutions
- Design has distinct start/end elements
- Working with geometric or structured patterns
- Creating borders for rectangular or angular shapes
When to use segmented art brushes:
- Organic, flowing designs
- Single continuous element that can stretch
- Curved applications where corners don't matter
- More painterly, hand-drawn effects
Neither is better. They're tools for different jobs. Master both, and you've got serious design flexibility.
Building a Pattern Brush Library for Faster Workflows
Smart designers don't recreate the wheel every project. They build libraries.
Create a dedicated Illustrator file called "Pattern Brush Library" (or something equally thrilling). Every time you create a pattern brush you might reuse, save it here.
Organize by category:
- Geometric borders
- Organic/floral elements
- Playful/whimsical designs
- Professional/minimal patterns
- Seasonal or themed brushes
Load this library at the start of new projects. Instant access to dozens of pre-made illustrator pattern brushes without starting from scratch.
Better yet? Save brush libraries as separate files you can share across projects or with team members. Consistency becomes effortless when everyone uses the same custom brushes.
For surface pattern designers working on multiple licensing projects or product lines, this approach maintains brand consistency while dramatically reducing production time.
How Pattern Brushes Elevate Colour Confidence
Here's the connection to fearless colour work: illustrator pattern brushes make experimenting with colour absurdly easy.
Because you can change brush colours independently from the rest of your design (using Hue Shift colorization), you can test dozens of colour combinations in seconds. No rebuilding, no redrawing.
This matters hugely when you're choosing colour schemes for rooms or creating product designs that need to work in multiple colourways.
Create your pattern brush in black or a neutral tone. Apply it to your design. Then play with colours until something makes your heart sing. The pattern structure stays perfect while you explore bold, vibrant, joy-inducing colour options.
This workflow removes the fear from colour experimentation. You're not locked into decisions. Change your mind? Change the colour. Still vector, still editable, still perfect.
Colour Workflow Tips
- Create brushes in neutral tones initially
- Set Colorization to Hue Shift for maximum flexibility
- Save colour variations as swatches for consistency
- Test brush colours against different backgrounds
- Remember: pattern complexity + colour boldness = visual impact
Pattern brushes give you the structural foundation. Colour gives you the personality. Together? Design magic.
Why This Matters for Pattern Designers and Creative Businesses
If you're licensing patterns, designing products, or creating custom artwork for clients, illustrator pattern brushes aren't just nice to have. They're essential.
Speed matters when you're running a creative business. Pattern brushes cut production time dramatically, letting you take on more projects or spend time on higher-value work.
Consistency matters when building a recognizable brand. Reusable brushes ensure your design language stays cohesive across products, platforms, and collections.
Flexibility matters when client requests change (and they always do). Editable brushes mean revisions take minutes, not days.
For maximalist designers who love bold patterns and playful designs, pattern brushes are the technical backbone that supports creative freedom. Master the tool, and you're free to focus on what really matters: creating joy-inducing, personality-packed, unmuted work.
The learning curve exists, yes. But the return on investment? Massive. Every hour you spend mastering illustrator pattern brushes saves dozens of hours in future projects.
Plus, let's be honest: watching a complex pattern appear perfectly along a curvy path with one brush stroke feels like actual magic. And who doesn't want more magic in their creative process?
Mastering illustrator pattern brushes transforms how you approach digital design, turning repetitive tasks into effortless creative exploration. Whether you're building decorative borders for homeware products, creating custom frames for art prints, or developing bold surface patterns for licensing, these tools give you professional results with playful flexibility. Ready to bring that same bold, pattern-loving energy into your physical spaces and personal style? The Colour Rebel helps you transform rooms and wardrobes with fearless colour confidence, vibrant patterns, and personality that refuses to stay neutral.
0 comments